

Completing open-enrollments in Paylocity HR & Payroll could be a nightmare without having the proper understanding of how to navigate through the interface and what options to select. It would lead to a mentally exhausting experience and countless errors that are often not rectifiable later.
That’s why we have compiled this detailed guide, keeping in mind the issues employees might face during enrollment. It explains to employees how to enroll in benefits on Paylocity, simplifying the whole process. So, keep reading and avoid the hassle.
Log in to your Paylocity account and follow the given steps:
- Click the three bars (☰) in the top-left corner
- Select ‘Benefits’
- Choose ‘Open Enrollment’ and press ‘Start’
The first stage involves adding family members like your spouse or kids into the system. Here’s how you can do it:
- Click on each family member’s name to fill in or update information
- Press the ‘Add Family Member’ button to add a new person
- Fill in the details like name, date of birth, gender, age, and contact number
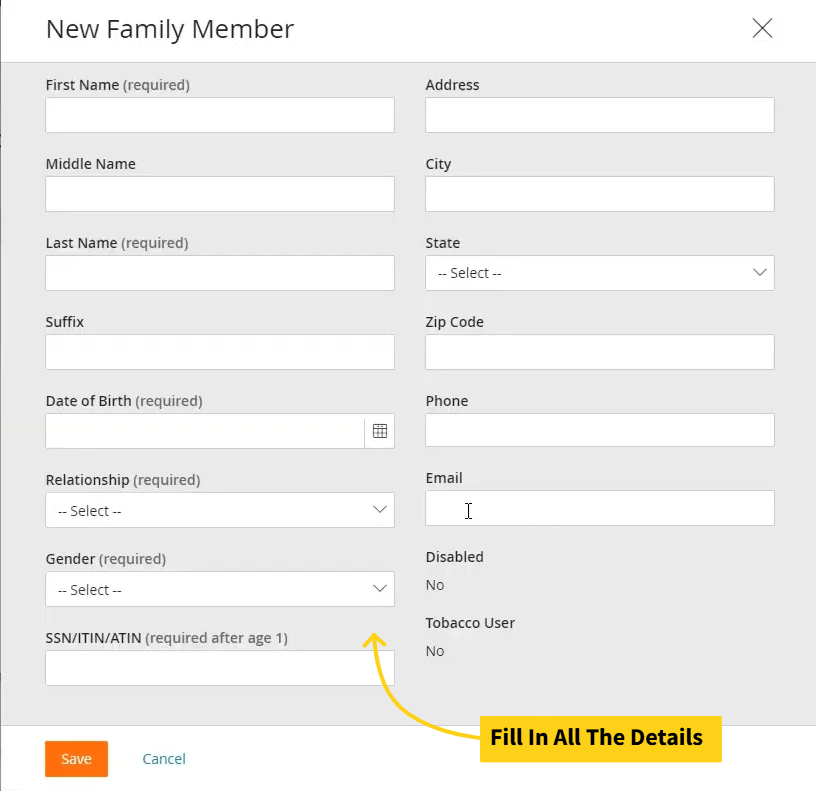
- Once done, click ‘Save’ to move to the next step
Users can choose a medical plan as well as which family members they want to cover on the plan. Here’s how to go about it:
- Check the box beside each family member's name to include them in the plan
- The estimated cost per pay period will change and reflect in the upper right corner of the screen as you add or exclude family members from the plans
- Click the drop-downs with each plan to see their details
- Select the ‘Waive Medical’ option if you don’t want to enroll in a medical plan
- Press ‘Continue’ once you are done
The next step is to enroll in a health savings account (HSA) plan. Follow the given steps to complete this part:
- Check the box beside the ‘Health Savings Account’
- Under the ‘Contribution Amount’, add the amount you are willing to contribute per pay period
- The system will then display the ‘Employee Annual Contribution’ and ‘Employer Annual Contribution’
- If you don’t want to elect HSA, just select the ‘Waive Health Savings Account’ option
- Press ‘Continue’
The next section that comes up lets users choose a Limited-Purpose Flexible Spending Account (LFSA). Follow the given steps to complete this section:
- Add the amount that you want to contribute in the ‘Employee Per Pay Period’ option under the ‘Contribution Amount’ heading
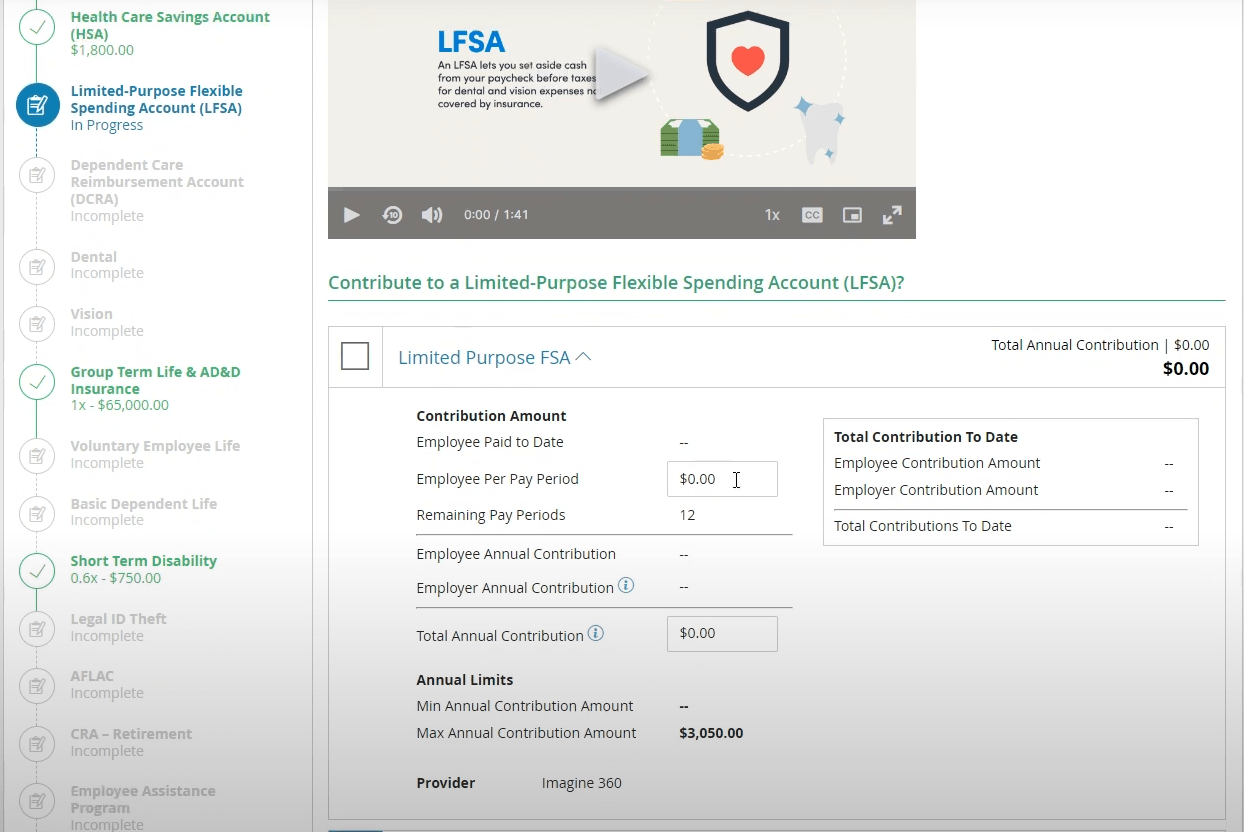
- Upon adding the amounts, the system will show the annual contributions from both the employee and the employer
- Check the ‘Waive Limited FSA’ to skip this plan
- Select ‘Continue’
A DCRA plan allows employees to set aside funds for eligible dependent care expenses like daycare and preschool. Here’s how to select it:
- Check the box beside the ‘Dependent Care FSA’ option
- Click the drop-down to see the details
- Enter the amount you wish to contribute or select ‘Waive Dependent Care FSA’
- Click ‘Continue’
Employees can enroll themselves and their family members in dental plans. Here’s the process:
- Choose the family members you want to cover in the plan
- Press the drop-down to see details for each offered plan
- Select the plan by checking the box beside it
- Click ‘Continue’ to save the changes
Enrolling in a vision plan entails the same process as selecting a dental plan. The steps are as follows:
- Select family members you want to cover in the vision plan
- Click the drop-down beside the plan names to see their details
- Choose the desired ones by checking the boxes
- Click ‘Continue’ to proceed or ‘Waive’ to skip the plan
It’s a benefit that is given by the employer to the employees themselves or their family in case they pass away or have a serious accident. You can select it as follows:
- Click on the ‘Desired Coverage Range’ to select the amount of coverage. It’s typically calculated based on an employee’s salary
- Select ‘Continue’
This coverage supplements an employee’s Accidental Death & Dismemberment (AD&D) insurance and is funded through payroll deductions. Here’s how you can elect it:
- Select the ‘Desired Coverage Range’
- Choose the ‘Coverage Amount’ you want. The interface will also display how much you’ll be contributing to the coverage amount
- Click ‘Continue’
The coverage for the spouse for this plan will be half of what an employee selects for themselves. So, for example, if an employee chooses $10,000 for themselves in the previous step, they’ll only be able to select coverage of up to $5000. Here’s the process:
- Choose the desired ‘Coverage Range’
- Select the coverage amount you want. It’ll also show the cost associated with each coverage amount
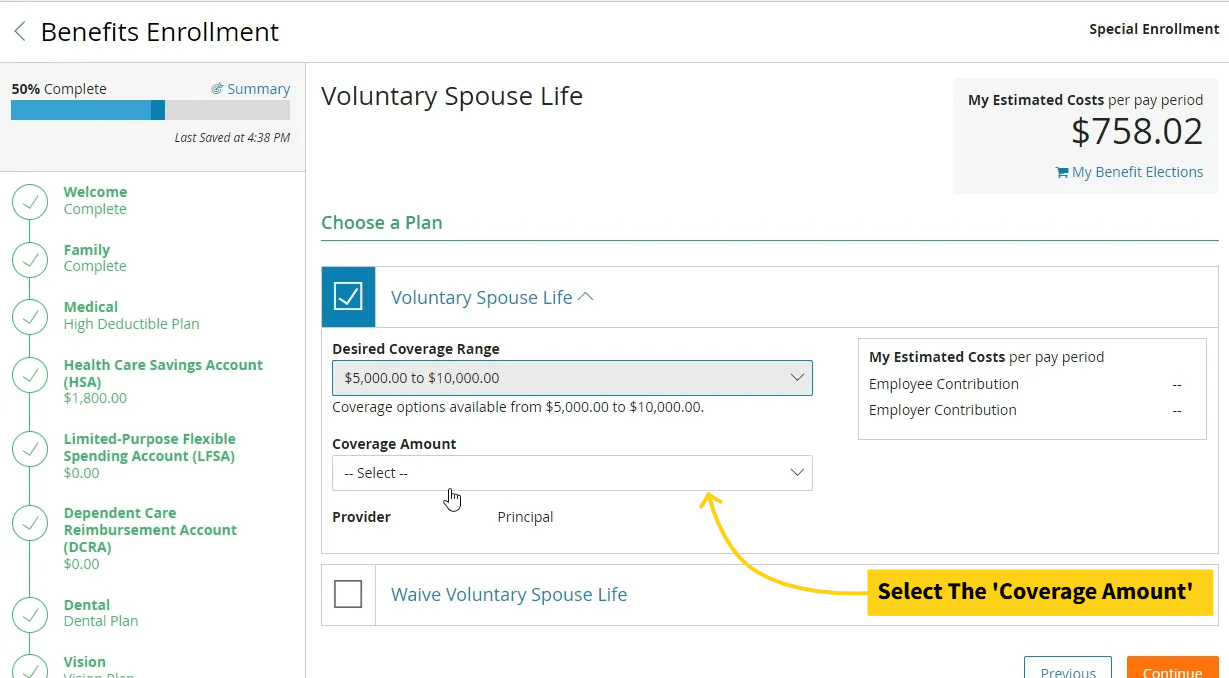
- Press ‘Continue’ to proceed or click ‘Waive’ to skip it
Voluntary Child Life Insurance
This stage lets employees choose life insurance for their children. It’s important to note that the amount of coverage for a child who’s less than 14 days old is $1000. Here are the steps to select it:
- Choose the ‘Desired Coverage Range’
- Select the coverage amount by clicking the drop-down button
- Press ‘Continue’ to proceed
Basic Dependent Life Plan
This coverage is 100% employer-paid, meaning there will be no contributions from the employer’s side. These are the steps to select it:
- Choose the ‘Desired Coverage Range’
- Click the drop-down to select the ‘Coverage Amount’
- Press ‘Continue’ to proceed
- If you want to skip it, select ‘Waive Basic Dependent Life’
Short Term Disability Coverage
Disability coverage is for times in life when employees suffer from a life-changing disability. These are the steps to select it:
- Select the ‘Desired Coverage Range’
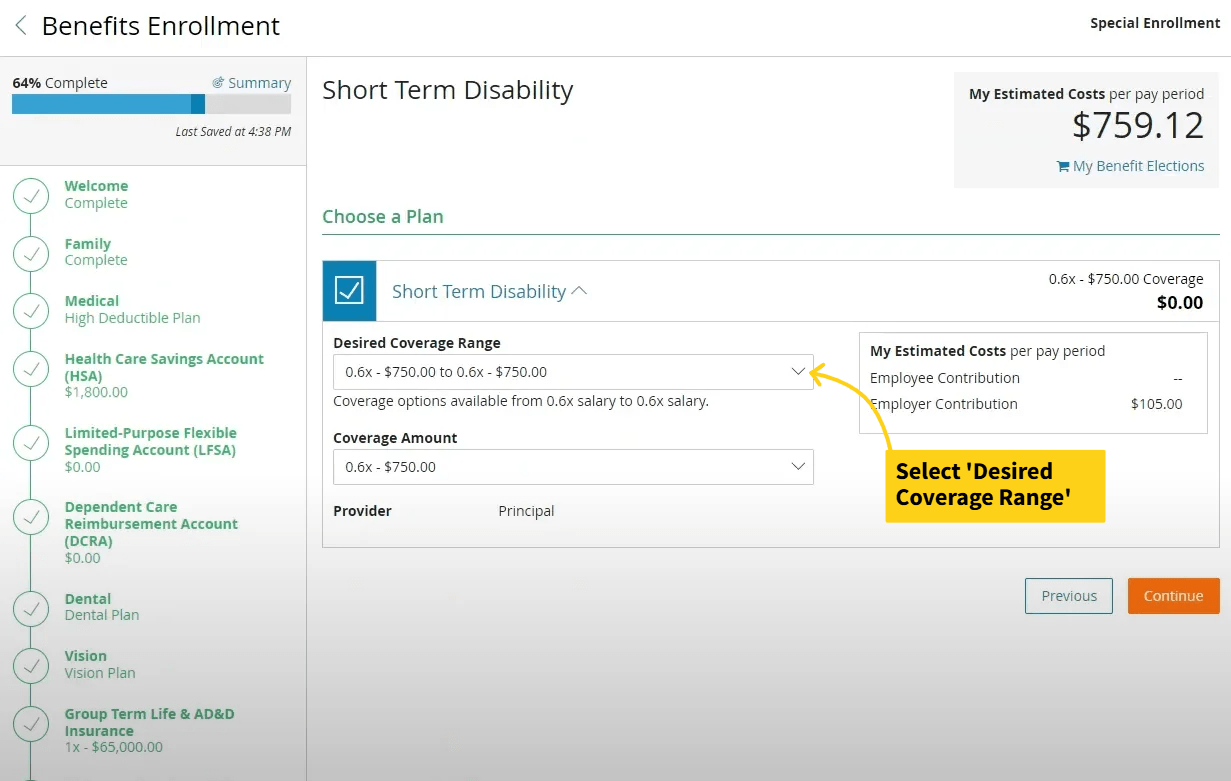
- Click the drop-downs to choose the ‘Coverage Amount’
- Press ‘Continue’ to save the changes and proceed
Other Elections
The rest of the elections are pieces of information that employees are supposed to read thoroughly. These details can help employees better understand the selected plans and make changes if needed.
Selecting Beneficiaries
The last step involves selecting the beneficiaries for the whole enrollment program. The displayed beneficiaries will be the family members added in the first step of the process. Users can also add new beneficiaries at this stage if they want:
- Click the ‘Add Beneficiary’ button if you want to add a new beneficiary
- Add the desired percentages under each benefits plan. For example, you can split a benefit in half by adding 50% in front of each beneficiary's name
- Press ‘Apply To All’ to split every plan according to the same percentage distribution, or manually add percentages in front of each plan
- Click ‘Continue’ to save the changes
- On the next page, review all the details and click ‘Submit’
Once submitted, the elections will have to be approved by the human resources department before they are activated.
Final Words
Open enrollment can be a tedious task, but with this detailed guide, it should be an easy one. You may get different stages and plans than the ones we have shared above, based on your preferences and benefits availability.
It’s important to keep in touch with your employer if you find an unusual field while adding the details or just cannot understand some calculations. Doing so will help you avoid making errors and keep the whole enrollment process smooth.