Cerner EMR, now known as Oracle Health, is a widely used software system designed to reduce administrative burden and improve healthcare delivery. The platform helps create and manage patient lists, which allow administrators to organize and access patient information quickly.

In this step-by-step guide, we’ll explore how you can create a patient list in Cerner and why it’s an essential tool for healthcare professionals. 

Why Are Patient Lists Important?

Patient lists in Cerner EMR allow practitioners and their staff to group patients based on specific criteria such as location, diagnosis, or relationship with the provider. This functionality improves workflow efficiency by enabling quick access to relevant patient groups, streamlining communication, and enhancing care coordination. 

How To Create A Patient List In Cerner

To create a patient list in Cerner, follow the below-given steps: 

Log In To Cerner PowerChart 

  • Open the Cerner Work shortcut from your desktop
  • Access the ‘Cernerworks’ menu and select the ‘PowerChart’ icon
  • The system will automatically log you in if single sign on is enabled. Otherwise, enter your ‘Username,’ ‘Password,’ and ‘Domain’ manually and press the ‘OK’ button
select-power-chart
cerner

Access The Patient List Feature 

  • Once you are on the main dashboard, click on the ‘Patient List’ icon from the toolbar in the upper left corner
  • Now, click on the ‘Wrench’ or ‘List Maintenance’ icon in the upper left corner to access the ‘Patient List’ build screen
first-step
locate-and-select

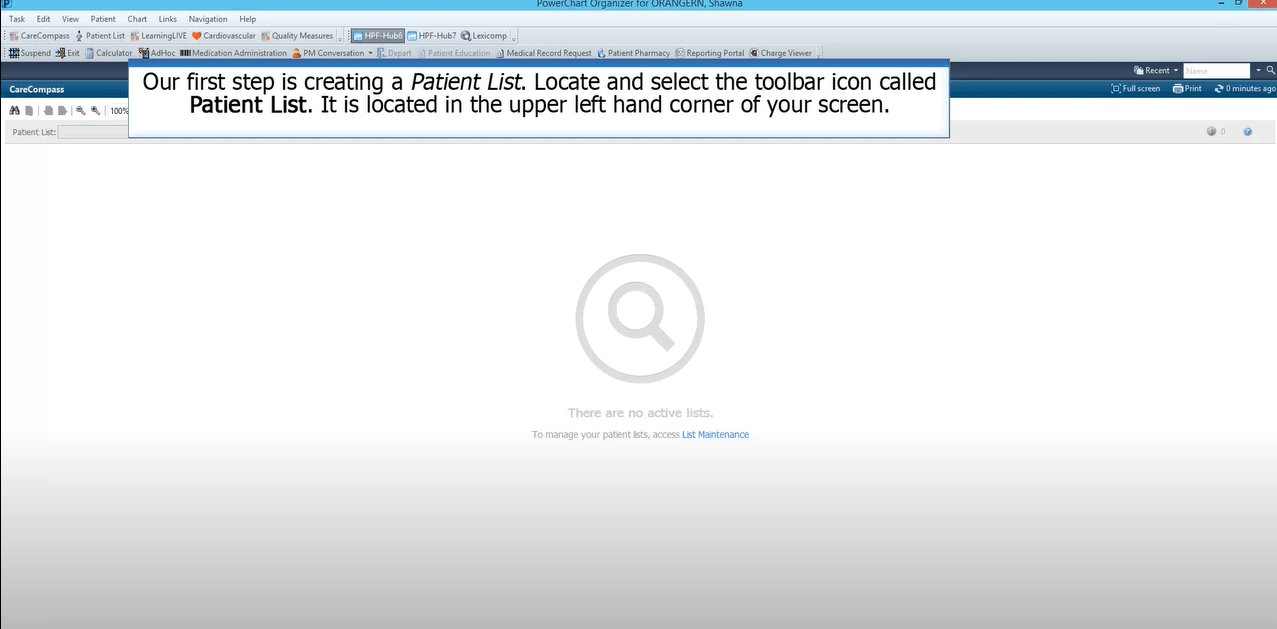
Create A New Patient List (Unit-Based List) 

  • Afterward, click the ‘New’ button in the bottom right corner of the ‘Modify Patient Lists’ pop-up window
  • Select ‘Location’ and then click the ‘Next’ button
select-new-button

Choose A Unit Location

  • Expand the ‘Location’ folder using the + mark
  • Expand the ‘Hospital Name’ by clicking the + mark
  • Scroll and select the ‘Unit Name’ (e.g., Med-Surg 2)
  • Check the box next to the ‘Unit Name’ to confirm selection
  • The selected name will now appear in the ‘Location’ column
location
next-button
mark
demo-purpose

Set Encounter Types 

  • Click ‘Encounter Types’ in the left column
  • Check the ‘Inpatient’ and ‘Outpatient’ boxes (for Med-Surg, Telemetry, and ICU)
left-column
outpatient

Set Discharge Criteria 

  • Select ‘Discharge Criteria’ in the left column
  • Now, click on the ‘Radio’ button next to ‘Only display patients that have not been discharged’ to include only active patients
criteria
finish

Finalize The Patient List 

  • Click the ‘Finish’ button to save the patient list 

Conclusion

Creating patient lists in Cerner is essential for healthcare providers aiming to improve workflow efficiency and care delivery. By grouping patients logically—whether by location, condition, or relationship—providers can quickly access critical information and focus on delivering high-quality care. 

Still not sure how to create patient lists in Cerner? Consider signing up for a free Cerner demo for a more comprehensive understanding.