
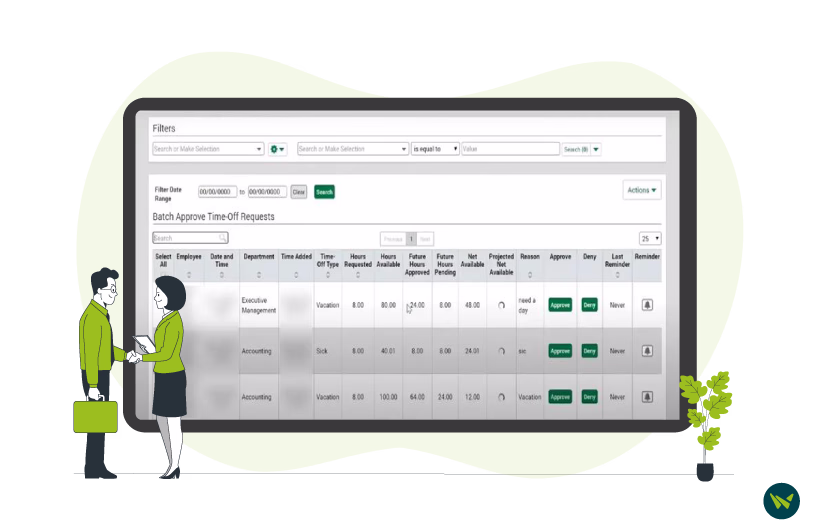
To disapprove time requests, you need to access your manager portal, where you can log in using your credentials. Since there is no app available for managers yet, you need to log in to Paycom through a web browser.
Remember, the entire process will feel seamless once you get acquainted with the ‘Notification Center’ that directs you to different modules to help execute various tasks.

The steps below will highlight the process of unapproving a timecard or a chosen pay period in Paycom:
- You can disapprove an employee’s timecard in Paycom by going to the trashcan sign located under the ‘Pay-Period Approvals’ tab
- To make corrections in the time entry or make amendments on the days approved, click on the trashcan logo
- You can also remove the entry time by clicking on the trashcan sign
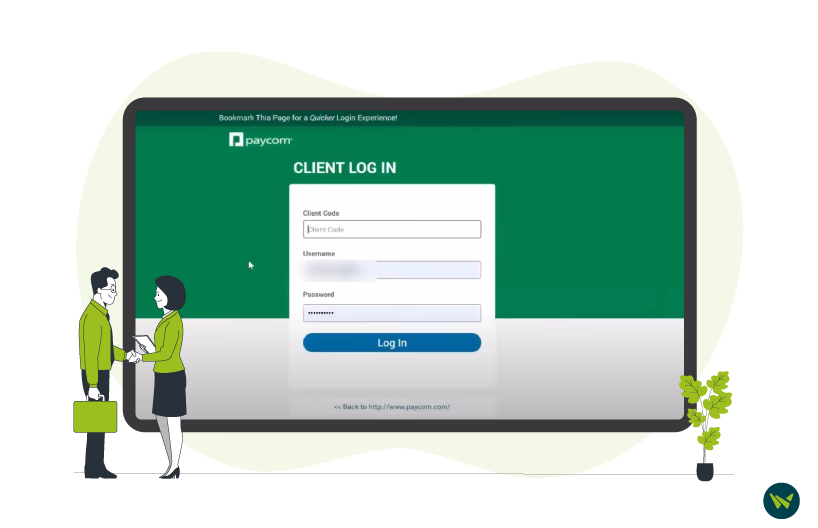
Start by logging into Paycom.com with your organization’s credentials and access the Client portal. Your account needs to have Manager-level access to approve timecard:
- Once logged in, go to the drop-down login menu located in the top right corner of the Paycom homepage
- Select the ‘Client’ section and enter your credentials to gain access

- To proceed further, enter your client code provided by your company
Timecard Entry
The timecard entry dashboard includes the list of all active employees
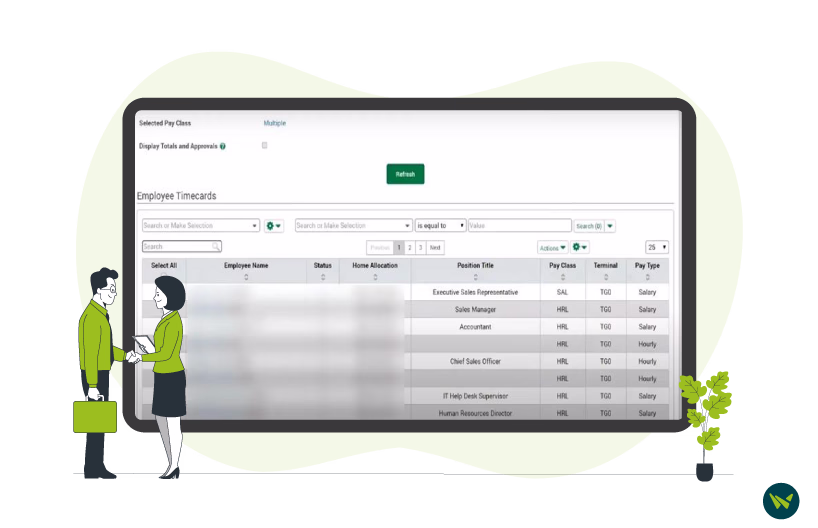
- From its drop-down options, search the employee's names. You can easily select the member whose time needs to be unapproved
- The employees' timecard dashboard allows you to batch approve or deny requests, or process them individually by clicking on the 'Actions' bar
- The time period is given on the top right corner of the page; navigate to it to choose the selected time period
- Next to the 'Add Hours' option is an 'Add Punch Pair' section. Click on it to proceed with the time entry process
- You can also add the date range in the section, typically starting from the payday, while you are working on it
- Mention the start and end of the working day by entering the 'Clock-In' and 'Clock-out' timings
- The next step is to scroll to the 'Service Code' section and choose the right code
- To submit an hour, go to the 'Add Punch Hour' option and mention the hours
- The rest of the fields on the page should be left empty. For each worked day, you have to repeat the entire process
Timecard Approval
- To proceed with the timecard approval process, go to the main menu and look up the 'Timecard Search' option
- Again, only the names of active employees are shown up in the section and you can choose the selected employee
- Navigate to the top right corner of the page and choose a suitable time period
- From the 'Pay-Period Totals' section, confirm the right service code which includes allocation, billable hours, and rates. Ensure that all the information selected here is correct
- Scroll to the drop-down menu and choose the last working day of the pay-period
- By clicking on the 'Approve Date' tab, you approve the duration for the chosen pay period
- Once you approve this duration, the timesheet gets locked, and no more changes can be made to it
To enter the full working hours again, repeat the whole timecard entry process as explained above. To re-approve the time-off requests, follow the same procedure as the time approval procedure explained earlier.
Paycom offers an easily navigable platform that helps employers execute time-approval and unapproval tasks efficiently. It saves time and stores all information in its database that administrators can later access for streamlined processes.